We're back! Sorry for the long long break we took. Summer was just too busy. We have been busy creating new and fun items and are excited to be sharing them with you. Hopefully in the next few weeks we will share our big changes with you, if all goes according to our plan, like anything does :)! Please check back with us to see our new changes!
-merrellgirls
October 2, 2012


May 31, 2012
Tape Tip
Here’s a tip for when you use masking tape to hang something on a wall. This might only apply to teachers, but who knows, you may find yourself in a tape predicament and you will be thankful you read this.
I hang a lot of artwork in the halls of our school and I want them to stay up for a long time since it takes me hours to hang them. An art teacher many years ago gave me this tip to be sure my artwork would stay put until I was ready to remove it.
Use 2” 3M masking tape (I have found that Quill brand works too…but not Staples). 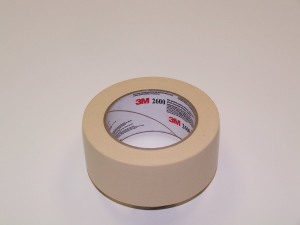

Tear a piece of tape about 8” long and roll it.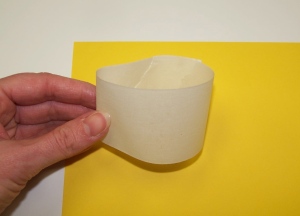

When you apply it onto the paper to be hung, make sure the over lapped part of the tape sticks to the paper and is lying as flat as possible, close to the corner or edge. 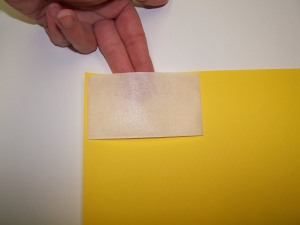 It is very important that the roll is horizontal!!! If it is vertical, gravity will do its job and your picture will soon roll and fall off the wall!! This can be very frustrating.
 It is very important that the roll is horizontal!!! If it is vertical, gravity will do its job and your picture will soon roll and fall off the wall!! This can be very frustrating.


**I do not recommend this for drywall; I use it for painted cinder block walls. I have heard that the blue painters tape works really well for drywall, I would still apply it the same way.
**Disclaimer** There is always a chance of any tape removing paint when it is taken off the wall.
May 22, 2012
Cake Cookies
I don’t even remember where or when we got this Chocolate Chip Cookie recipe but we have been known for it for years. It is so simple and yummy. Now the girls might argue which cake mix to use, but I only use Betty Crocker.
Cake Cookies:
1 box of Betty Crocker Yellow cake mix (do not follow the box instructions)
2 eggs
½ cup oil
½ a bag of chocolate chips
Stir all the ingredients together. Scoop them into small balls, about 1”. I used my small Pampered Chef scooper, I love this thing:

Bake 1 sheet full for 8 minutes or 2 sheets for 10 minutes
You can also use a chocolate cake mix and peanut butter chips, yum! (I’d bake these for 9 and 11 minutes.)
The only down side is that they don’t stay soft very long, maybe 2 days, so eat fast!
May 16, 2012
Ruched Sleeve baby onesie Refashion
I seem to have an overabundance (thank you to my sweet friends who have given my their daughter's hand-me-downs, they will be put to good use!) of long sleeve white onesies in the same size and a lack of shirts or onesies that my daughter can wear with patterned pants and skirts. So, since I am all about finding ways not to spend money by using what I already have I decided to make a new fun white shirt/onesie for my daughter out of my extra long sleeve onesie.
Want to make your own?
What you need
Mark on each sleeve where you want to cut off the sleeve using pins or a Marking Pen Disappearing Ink like this one from Dritz. I made mine 3 inches long. Cut your sleeves off but save your scraps for later! Hem up the sleeves by folding under a 1/4 inch and iron (don't skip the ironing, it will look so much better). Then fold it over another 1/4 and iron again. Sew all the way around about a


Your done! Put it on your little girl and it will be as cute as can be!
Want to make your own?
What you need
- A long sleeve shirt or onesie in the correct size of your little girl (can use a short sleeve shirt)
- Matching elastic thread (don't be scared to use this, it's fun!)
- sewing machine
- Pins & scissors
- Matching thread
Step One
*If you start with a short sleeve shirt you can skip Step One, however your sleeves will be a little shorter in the end. Mark on each sleeve where you want to cut off the sleeve using pins or a Marking Pen Disappearing Ink like this one from Dritz. I made mine 3 inches long. Cut your sleeves off but save your scraps for later! Hem up the sleeves by folding under a 1/4 inch and iron (don't skip the ironing, it will look so much better). Then fold it over another 1/4 and iron again. Sew all the way around about a
Step Two
At this point use whatever marker you choose and mark where you want the ruched line to be. I layed the shirt down flat to find the middle of the shoulder and middle of the bottom of the sleeve.
Step Three
Thread your sewing machine with maching thread. Hand thread your bobbin with your matching elastic thread. Just wind it using your hands just like it would with the machine but don't pull it tight or leave it loose. Here are some great tips to winding a bobbin with elastic thread and tips on how to use the thread at danamadeit.com
Step Four
I started sewing at the bottom of the sleeve and went all the way up to the shoulder where I had marked it. Make sure you back stitch at the beginning and end of your sleeve. Now here is the fun, your sleeve should scrunch right up on it's own! If you want to give it extra scrunch, you can spray the ruched part or the sleeves with water and then iron!
Step Five
You could finish at this point but I didn't like the way the end of my sleeves looked after they were ruched. So, I decided to give it some more "girlyness" by putting a ruffle at the bottom of the sleeve. Since my elastic thread was already on the bobbin I just sewed along the hemline of the bottom of each sleeve making sure to back stich at the beginning and end. Whola! Instant ruffle!

Adding a Flower to your shirt
Of course there are tons of different flower tutorials out there you could use to dress up your onesie. I wanted something somewhat simple and I wanted to again use what I already had. Here is what I did for the flower.
Step One
I wanted the flower to have a clean edge instead of a raw cut edge (which would also work well and be cute). I used the sleeves that I had already cut off and cute about a inch from the hem of each sleeve and cut all around both sleeves.
Step Two
I then sewed each strip together at each end so I could have one long strip instead of two shorter ones.
Step Three
You could use your elastic thread again but since it isn't cheap I decided to just use regular thread to make a ruffle. To make the ruffle just use a longer (basting) stitch. Back stitch at the beginning and sew to the end but do NOT back stitch at the end. Pull the thread at the end and push your fabric the other way creating a scrunched ruffle. 

Step Four
Take your ruffled strip and roll it into a spiral so it looks like a flower. Hand stitch the bottom of your flower with some strong thread and just sew the heck out of it to make sure all the layers are secure and together. You want to make sure it is curious baby proof and that it will make it through the laundry! Once you are happy with your flower, pick where you want to attach it to your shirt and hand sew it to that spot, again using lots of stitches to secure it in place. 
Your done! Put it on your little girl and it will be as cute as can be!
May 9, 2012
Cutting Brownies
My family LOVES hot out of the oven brownies! But it bothers me when they get all torn up when you cut them. I know I could wait till they cool to cut them, but I like them warm.
Well, here is a tip my good friend gave me a couple of years ago. Use a plastic knife to cut your brownies. I have to admit that at first I didn’t want to try the tip because she is younger than me and I prided myself on having good tips… but finally I gave in and tried it. It worked great, even when they are still hot!
PS. We, well I, only use Duncan Hines Chewy Fudge Brownies, mmm, those are the best brownies.
May 5, 2012
Reuse your husband's old t-shirt!
I finally got my husband to clean out his closet and dresser drawers and he accumulated quite a pile of clothes. So before I donated them, I picked out some nice t-shirts that I wanted to add to my wardrobe. These t-shirt were in good condition, he just didn't wear them anymore. All I needed to do was tailor them a little so they would fit me better!
I like to sew, but I don't really know all the correct techniques of sewing. I pretty much make it up as I go. I did take 2 sewing classes in high school so I know the very basics. I try to do things as simple and easy as I can. So forgive me for not knowing the correct sewing techniques or terms.
This is what you need:
Big t-shirt (husband's t-shirt)
Smaller fitted t-shirt (for tracing template)
Sewing machine
Thread (similar color as big t-shirt)
Fabric pen/marker (a washable pen/marker that is used for marking fabric to tailor clothes)
Scissors
Straight pins
Here is what I did:


This is my husband's shirt which is too big and wide on me. I just wanted to take it in on the sides and under the arms.
1. Take your husband's shirt or a big t-shirt and turn it inside out.  Lay your smaller fitted t-shirt on top of your bigger t-shirt to be used as a tracing template. Use a fabric pen/marker to trace the outside of the smaller fitted t-shirt. I made little dash marks along the outside of the smaller t-shirt. I only traced the sides of the shirt and the under arms. I left the length of the sleeve as is.
 Lay your smaller fitted t-shirt on top of your bigger t-shirt to be used as a tracing template. Use a fabric pen/marker to trace the outside of the smaller fitted t-shirt. I made little dash marks along the outside of the smaller t-shirt. I only traced the sides of the shirt and the under arms. I left the length of the sleeve as is.
 2. After tracing the smaller t-shirt, take straight pins and pin along the trace marks. This is to hold the t-shirt together while sewing.
3. Next, sew a straight stitch along the trace marks (if you prefer another stitch, go for it, I just usually use a straight stitch). Remember to back-stitch at the beginning and end of the straight stitch. When finished sewing both sides of the t-shirt, turn it right side out and try it on. If you like the fit, turn the shirt inside out and trim the excess fabric fairly close to the stitch you just sewed. If you feel the shirt should be taken in some more, sew another stitch in closer to make it more fitted.

There you go, now you have a new fitted t-shirt!
Here is my new fitted t-shirt! I kept the sleeves the original length. But you can always hem them up to a shorter length if you like.
I hope you enjoy and get a new use out of your husband's old and beloved shirt!
May 3, 2012
Pre-Vacation Tip
This is a tip that we learned from our mom. When we were younger and were going to go on a vacation or a weekend away our mom would always make sure the house was straightened up and the kitchen clean. We just thought that was crazy, we were going to come home and mess it up anyway. But now that we are older and wiser :), we see the value in a quick clean before leaving for a vacation. Coming home to a straighten up house or a clean kitchen brings a sense of peace and relaxation. We don't feel like we have to do any housework, we can just relax before a new week starts.
We are not saying that the whole house needs to be clean, just pick up a few things, put the dishes in the dishwasher (or wash them), take the trash out, whatever makes your house feel a bit cleaner. That way when you come home from a long trip you won't feel overwhelmed thinking you have to clean everything up. Now maybe you already do this or you don't mind coming home to housework, but we feel this is a great tip to use before you go on a trip. We hope this tip is helpful to you!
-Merrellgirls
April 30, 2012
Photo Cards How -To
My sister was telling me about a great idea to help babies/toddlers recognize family members, animals, objects whatever you would like. They are kind of like flash cards but with photographs and they can stick to the refrigerator. I thought it would be a great way for my little one to become familiar with her family members. I call them photo cards but you can call them what you like. I made one for each person in our family (grandparents, aunts, uncles, etc.). You can make them for anything you would like your child to recognize and become familiar with as long as you have a picture of it. The great thing about this is that you can use things you already have at home! Heres how I did it:
Materials:
Photos (magazines, newspaper, whatever photos you want your child to recognize)
Old photo album (I cut the individual pictures sleeves out of an old photo album)
Cardboard
Scissors
Paper
Marker/pen
Doubled sided tape
Magnetic Tape (the magnet strips that are sticky on one side, I got mine at Untied Art & Education, but I'm sure you can get them almost anywhere)
Clear packaging tape (optional)

Once you have all of your materials together you can start. I took the photo sleeves out of an old photo album and cut them so were individual photo pockets. Put your picture in one side of the photo pocket.

Take your cardboard and cut it little smaller than the size of your picture. My picture is a 4x6 so I cut my cardboard to 3 3/4x 5 3/4. Once your cardboard is cut you can put it into the other side of the photo pocket.

Now take you magnetic tape and cut 2 two-inch pieces. Stick the magnetic tape on the cardboard side of the photo pocket.

Now your photo card is complete. There are some optional things you may want to add to your photo cards. I decided to write the name of the picture so little ones could see the word and become familiar with it. For this picture I wrote Flowers on paper in marker and cut it out. Then I used my doubled sided tape and stuck one side of the tape on top of the word Flowers. Now the other sticky side of the tape can be stuck on the inside of the photo pocket in front of the picture!
The other thing I did was I used clear packaging tape to seal the open side of the photo pocket. I wanted to make sure the picture and cardboard wouldn't be taken out by little hands!
Then you can stick it to your refrigerator and the little ones can pull them off and put them on all the while learning and familiarizing themselves with family members, objects, animals, etc.

So there it is a photo card how-to. I hope it makes sense and is helpful to you! Happy making!
April 25, 2012
Freezing Cookie Dough
My family likes to have cookies once in awhile but when I make them, the 3 of us can never eat them all. Then I remembered that a friend had mentioned freezing her cookies after they cooled. Well I decided to change that idea a little because I only like cookies right out of the oven. When I make cookies, I bake 6 (2 each) and then continue to ball the rest of the dough into the correct portion and put them in a freezer bag. On the bag I write the temperature and the amount of time to bake them (I add 2 minutes due to them being frozen) and put them in the freezer. So, whenever we feel like a cookie I grab a few out of the freezer and throw them in the oven.
I also use parchment paper on my cookie sheets so I don’t have to wash the pan! That makes baking cookies so much more enjoyable. Parchment paper is expensive, but I wait until I find a coupon in the newspaper before I buy it. Then I cut it to just fit my sheet, when I am done using it, I fold it up and use it again for the next batch of cookies. I read that you can reuse it a few times; I use it no more than 3 times. That way I feel like I am getting my money out of it.
One more cookie tip, if you like warm cookies like me, I put non-warm cookies in the microwave for 11 seconds (some microwaves may very). Put one or 2 on a napkin toss it in the microwave and yum yum!
-Piper
April 23, 2012
Coat Hooks for Curtain Tie Back Hooks
I made the curtains for our house. Nothing fancy just simple straight rod pocket curtains. I usually put the curtains on a tension rod and stick the rod inside the frame of the window. We open the curtains daily to let in as much light as possible, so I needed curtain tie back hooks to keep the curtains open. Curtain tie back hooks can be expensive. A lot of the ones I looked at were too big and gaudy for what I wanted. I wanted simple and sleek. So I got the idea to use coat hooks. They are basically the same thing, coat hooks are just a little smaller.
 |
| Here is the curtain hanging down with the coat hook next to the window frame. |
 |
| This is the coat hook, pretty nice huh? |
 |
| Here the curtains are open and being held back with the coat hooks. |
 |
| Close up of the curtain and the coat hook! |
 |
| This is another curtain that I used coat hooks for the tie back hooks. The hook is to the left of the window. |
 |
| Very small coat hook. |
 |
| Open curtains with coat hooks as tie back hooks. |
 |
| Close up of the curtain and coat hook. |
For the first 4 pictures (the brown curtains) I don't actually tie back these curtains. I just have the hooks hold the fabric back. It works great. I got these hooks at IKEA a few years ago.
In the next 4 pictures, I used silver hooks that I got at Walmart. They are much smaller than the IKEA hooks. For these curtains, I do tie them back. The hooks are too small to hold all of the fabric back. I took some ribbon that matched my curtains and made a big loop, tied it in a knot, and hooked it around the coat hook.
And there you have it, an inexpensive way to get curtain tie back hooks!
April 20, 2012
Parchment Paper
Parchment Paper...not just for baking.
I do a lot of things with Hot Glue because I love how it sticks to almost everything. Well, one time I needed something that hot glue would not stick to. I tried wax paper but the hot glue melted the wax and stuck right to the wax paper. Then I tried parchment paper and that was the answer!! You can draw with the hot glue right on the parchment paper and it will peel right off. Now I keep a piece of parchment paper with my hot glue gun. I use it to catch the glue drips or if my gun falls over, I don't have to worry about it sticking to anything.
April 18, 2012
Flower Photos
I love pictures. I love looking at them, taking them, and sometimes I don't even mind being in them. The last few years I developed a love for taking pictures of nature. Capturing God's beautiful creation is truly amazing. I don't really know the ins and outs of photography or the technical terms, and I am by no means professional. I just love taking pictures and I want to share some of them with you!
The first picture is a daisy from my own garden. I think daisies are such a fun happy flower. This one I decided to make Black & White.

The next picture is the same flower B&W with yellow center of flower.

The last picture is of a flower called a Zinnia. I have some beautiful Zinnias in my garden, but this picture was taken at a state park. I love the amazing detail and color in this one!

The last 2 pictures I have hanging in my kitchen. They bring such a bright cheerful feel to the kitchen! I hope you enjoyed them.
April 3, 2012
Mother's Day Gift!
Mother's Day is May 13th, almost a month away. Do you have a gift for your mother or wife? Then its time to put in your order for a Custom V & P painting. What mother or grandmother wouldn't love to have their child or grandchild's drawing transformed into a beautiful work of art?
V& P paintings are hand painted onto the canvas size of your choice. You get to choose the color scheme for your painting from our wide variety of colors. When ordering a Custom V & P painting you get to communicate with the artist, via email, to discuss the important details of your painting!
V& P paintings are hand painted onto the canvas size of your choice. You get to choose the color scheme for your painting from our wide variety of colors. When ordering a Custom V & P painting you get to communicate with the artist, via email, to discuss the important details of your painting!
 |
Child's actual drawing
|
 |
Finished Custom V&P painting
|
Placing an order is easy, just click on the merrellgirls shop and follow the simple steps. You will be asked to scan your child's, grandchild's, niece or nephew's original drawing. Then email it to us with your color choices and canvas size. Merrellgirls will contact you via email to discuss the details of your painting. When all the details are finalized, we will begin creating your painting!
It could take a few weeks before you get your finished painting. So please order now so you have your painting in time for Mother's Day! Questions or comments please email us at merrellgirls@gmail.com |
April 1, 2012
Bath Towel Savers

We got the Bath Towel Saver tip from our mom. Whenever all of us kids and our families get together at our parents for a long weekend or the Holidays, there is always an over abundance of bath towels being used. If you are like our mom or most people, you have matching guest towels. With all those towels it can get confusing as to which towel is yours. Our mom thought it would be helpful to have something to put on the towels that identified which towel belonged to which person. She wanted something that would be easy to use, big enough to see, and not permanent. That's when she thought to use clothespins.

They are easy to put on and take off of the towels (even kids can do it), big enough to be seen but not too big that it screams "Look at me," and it's not permanently put on the towels. This is what she did. She took enough clothespins (one for each person in the family), painted them (each family has its own color), and wrote each persons name on the front and back of the clothespins.


Simple enough. So now every time we come for a visit and use bath towels, we hang them to dry, find our clothespin with our name on it, and pin it on. No more forgetting which towel is yours! You can leave the clothespins plain with just a name on it. Or jazz it up with some color! The choice is yours.

The merrellgirls visit their parents quiet often in the summer (a couple of times a week) to use their pool. After being out in the hot sun, playing with kids, and swimming you need to freshen up before heading home. We use our clothespins to keep track of our bath towels for the week. Can you image the laundry our mom would have to do in one week if we didn't use the clothespin system? It's a good idea she thought of this!
This is perfect for guest the visit frequently and stay for long visits! It's also great for beach towels by the pool. Kids are always in and out of the pool, this way they will use one towel and remember which one is theirs. So go ahead and try the Bath Towel Savers. All you need is clothespins, paint (optional), Sharpie marker, towels, and guests! We hope you like the Bath Towel Savers!

March 29, 2012
Organizing Card Games
My family loves games, but my husband's family really loves playing games. Every time we get together we play games. Board games or card games, it doesn't matter, as long as we are together and having fun! I learned this little organizing tip from my mother-in-law. She keeps all of her card games in a small plastic storage tub! Brilliant! Its perfect, whenever we want to play a game we know right where they are, all the cards are in their boxes (no need for counting), she even keeps paper and pens/pencils in the box for keeping score. She brings the game box to relatives' houses, camping trips, and anywhere we might want to play a game. So after all of these years I finally started my own game box.
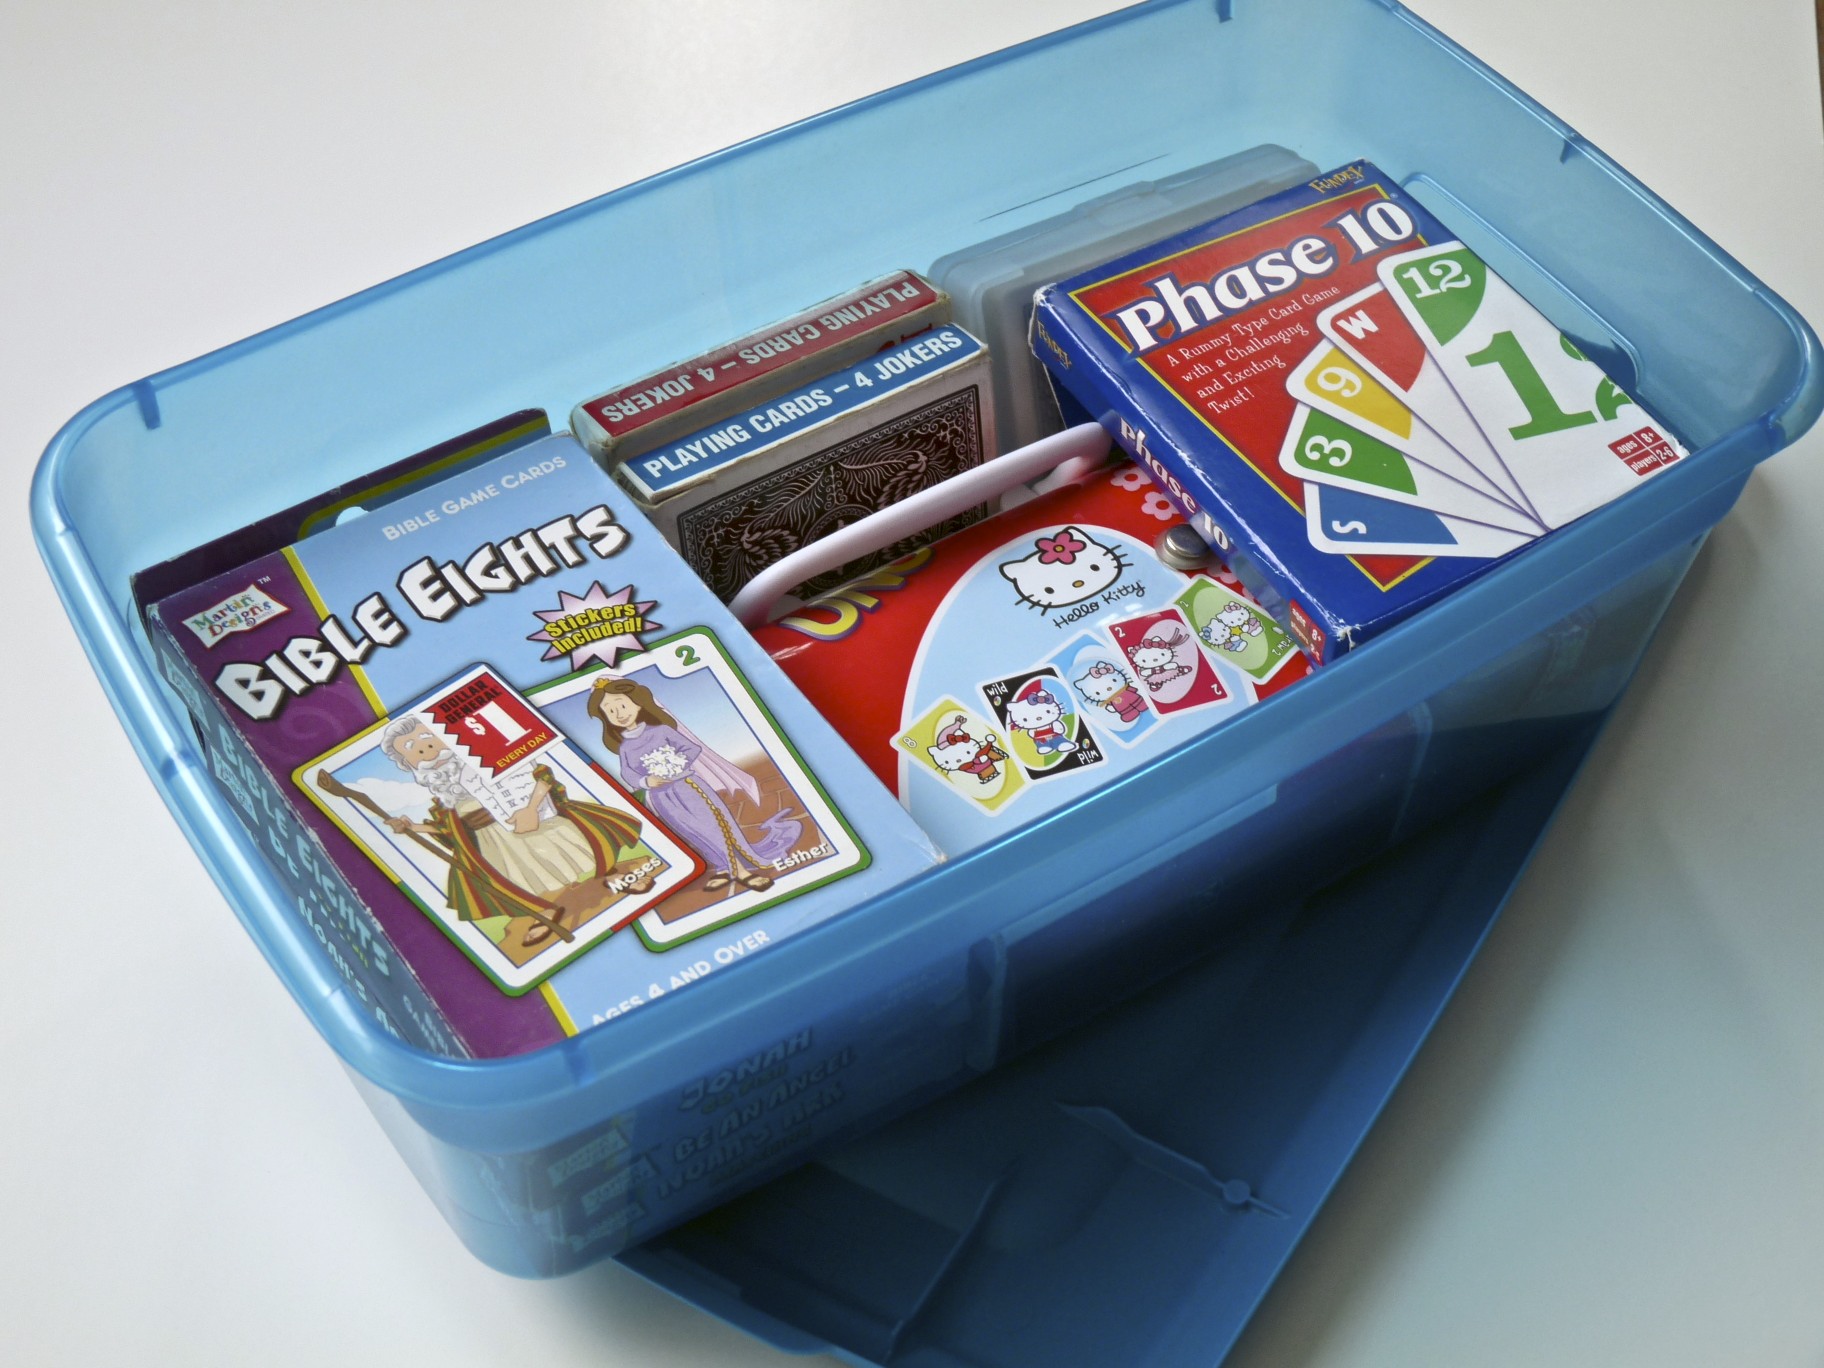
Mine is still a work in progress, but you get the idea! I like everything to have a place, and now even our cards do!
*By the way I love plastic storage containers, all sizes, especially the big ones. I even ask for them for Christmas! They have so many uses. I store seasonal decorations, out of season clothes, old toys that we still want to keep, books, and so much more. I love it because I can label each box, things are in there place, and the items in the box are protected from water, dust, and bugs. They are a great way to get organized!
March 24, 2012
New eye make up remover (even for waterproof mascara)!
In my post Makeup Remover and Shower Cleaner, I gave a recipe for a make up remover, and I mentioned that I was going to add more olive oil to it. I added enough oil to make the total amount 1/4 tsp. I got the same results, the eyeliner came off great but the majority of the mascara stayed. I think this recipe is a little to watery. I wear waterproof mascara, so I need something a little stronger. So I searched the internet for other make up remover recipes. I didn't really find much. Some people said they used just oil, while others said they used just baby shampoo. So I got to thinking what if I just made my own recipe with more oil and shampoo and less water. So I did and I think it works great!
I had a 3 fl. oz. travel container with a flip top lid that I used to store my make up remover. I added 1 oz.( 2 Tbsp.) olive oil, 1 oz. (2 Tbsp.) baby shampoo (tear free), and 1 oz. (2 Tbsp.) water. Shake it up and you are good to go! I tested it on my arm, I put eyeliner and mascara on my arm, let them dry, then used the make up remover to remover them. And what do you know, they both came off much easier and cleaner than the other remover. The real test of course is how well does it come off your eyes. I have been using it for the past couple of days and it does the job. I'm very excited that I found something that is quick and easy to remove even waterproof mascara! Hope this works for you as well as it did for me!
 |
| Materials you need! |
 |
| Finished product! |
March 19, 2012
House Warming Gift
Here is another idea for the Custom V&P Painting, a house warming gift! My friends were building a new house so my husband had a great idea to have their 2 children each draw a picture of their new home! Here is their drawings and the finished paintings.
Annaliese age 9
|
| Child's actual drawing |
|
| Finished Custom V&P painting |
Will age 6
 |
| Child's actual drawing |
 |
| Finished Custom V&P painting |
My friends loved them! The mother said "You brought their drawing to life."
The custom V&P paintings are such a great gift idea! If you are interested in purchasing a Custom V&P painting click on the link below. We can start bringing your child's artwork to life!
March 17, 2012
Roman Shades
I decided that I wanted Roman shades in a couple of rooms in my house. Well I wasn't about to buy them, they can be so expensive, and you know how we like to save money. So I got the brilliant idea to make Roman shades. So I searched online to find the quickest and easiest way to make Roman shades, and I think I found it. Little Green Notebook has a great DIY for making roman shades out of mini blinds. It has easy to follow directions and there is no sewing involved! If you want to make the Roman shades click on the Little Green Notebook link above. I'm going to show you a couple of Roman shades that I made and give a few tips that I learned from making them. Now remember this was my first time making the shades, so they aren't perfect!


These were the first shades I made, I'm not the best at measuring things or cutting things straight. So my first tip would be have someone help you with measuring and cutting if your anything like me. My wonderful husband helped my with the other shades!


For these shades I lined them with room darkening fabric. I recommend using the room darkening fabric for rooms such as the bathroom or a bedroom.


Again I used the room darkening fabric for these shades as well. As you can see, the Roman shades fit perfectly into a window, when measured and cut correctly, and look really cute!
On the Little Green Notebook site she suggests using fabric glue and not hot glue. I used fabric glue and it did a great job, especially on the white shades I made (the first pictures). Those shades rarely get used so there isn't much wear and tear on them. They other shades, however, are used daily. They are pulled up in the morning and down at night, so needless to say, the glue isn't holding up so well. I know she says not to use hot glue but I needed a quick fix for the fabric that is not glued to the mini blinds anymore. We'll see how the hot glue holds up. What I suggest doing is sewing the fabric to the mini blinds. Just one vertical stitch on both sides of the shade where the fabric is folded over. I did not do this to my shades and I wish I did. My sister made some and she sewed the fabric the the mini blinds and they seem to be staying together just fine. Now if you decide to sew your fabric to your mini blinds make sure you get the cheap plastic mini blinds and not the metals ones. I got my mini blinds at Walmart, they can range anywhere from $5-$15 depending on the size of your window. Also use a strong needle that will sew through the thin plastic.
If you use the room darkening fabric, you might want to sew it to your printed fabric, that way it will hold together better than gluing it. Just make sure you leave the bottom open (meaning sew the left side, top, and right side) that way you won't get an air bubble in between printed fabric and the room darkening fabric. I didn't do this so I have an air bubble in my shades and they don't lay very smooth.
I think those are all of my tips I hope this is helpful! Let us know if you tried making your own Roman shades!
-Kiley
Subscribe to:
Posts (Atom)