We're back! Sorry for the long long break we took. Summer was just too busy. We have been busy creating new and fun items and are excited to be sharing them with you. Hopefully in the next few weeks we will share our big changes with you, if all goes according to our plan, like anything does :)! Please check back with us to see our new changes!
-merrellgirls
merrellgirls
Art, Household Tips, Crafts/DIY, Recipes
October 2, 2012
May 31, 2012
Tape Tip
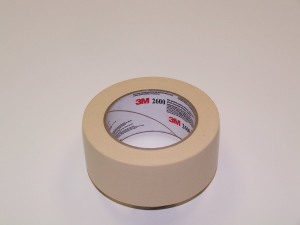
Here’s a tip for when you use masking tape to hang something on a wall. This might only apply to teachers, but who knows, you may find yourself in a tape predicament and you will be thankful you read this.
I hang a lot of artwork in the halls of our school and I want them to stay up for a long time since it takes me hours to hang them. An art teacher many years ago gave me this tip to be sure my artwork would stay put until I was ready to remove it.
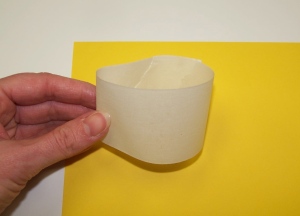
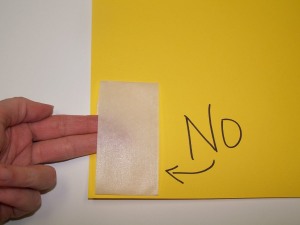
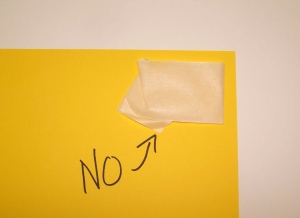
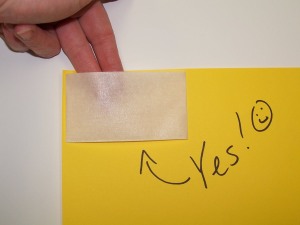
When you apply it onto the paper to be hung, make sure the over lapped part of the tape sticks to the paper and is lying as flat as possible, close to the corner or edge.  It is very important that the roll is horizontal!!! If it is vertical, gravity will do its job and your picture will soon roll and fall off the wall!! This can be very frustrating.
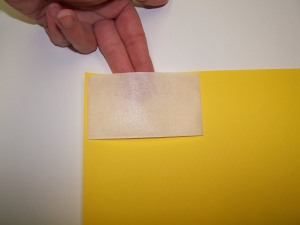 It is very important that the roll is horizontal!!! If it is vertical, gravity will do its job and your picture will soon roll and fall off the wall!! This can be very frustrating.
**I do not recommend this for drywall; I use it for painted cinder block walls. I have heard that the blue painters tape works really well for drywall, I would still apply it the same way.
**Disclaimer** There is always a chance of any tape removing paint when it is taken off the wall.
May 22, 2012
Cake Cookies
I don’t even remember where or when we got this Chocolate Chip Cookie recipe but we have been known for it for years. It is so simple and yummy. Now the girls might argue which cake mix to use, but I only use Betty Crocker.
Cake Cookies:
1 box of Betty Crocker Yellow cake mix (do not follow the box instructions)
2 eggs
½ cup oil
½ a bag of chocolate chips
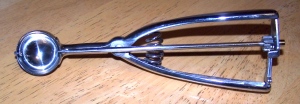
Stir all the ingredients together. Scoop them into small balls, about 1”. I used my small Pampered Chef scooper, I love this thing:
Bake 1 sheet full for 8 minutes or 2 sheets for 10 minutes
You can also use a chocolate cake mix and peanut butter chips, yum! (I’d bake these for 9 and 11 minutes.)
The only down side is that they don’t stay soft very long, maybe 2 days, so eat fast!
May 16, 2012
Ruched Sleeve baby onesie Refashion
I seem to have an overabundance (thank you to my sweet friends who have given my their daughter's hand-me-downs, they will be put to good use!) of long sleeve white onesies in the same size and a lack of shirts or onesies that my daughter can wear with patterned pants and skirts. So, since I am all about finding ways not to spend money by using what I already have I decided to make a new fun white shirt/onesie for my daughter out of my extra long sleeve onesie.
Want to make your own?
What you need
Mark on each sleeve where you want to cut off the sleeve using pins or a Marking Pen Disappearing Ink like this one from Dritz. I made mine 3 inches long. Cut your sleeves off but save your scraps for later! Hem up the sleeves by folding under a 1/4 inch and iron (don't skip the ironing, it will look so much better). Then fold it over another 1/4 and iron again. Sew all the way around about a
Your done! Put it on your little girl and it will be as cute as can be!
Want to make your own?
What you need
- A long sleeve shirt or onesie in the correct size of your little girl (can use a short sleeve shirt)
- Matching elastic thread (don't be scared to use this, it's fun!)
- sewing machine
- Pins & scissors
- Matching thread
Step One
*If you start with a short sleeve shirt you can skip Step One, however your sleeves will be a little shorter in the end. Mark on each sleeve where you want to cut off the sleeve using pins or a Marking Pen Disappearing Ink like this one from Dritz. I made mine 3 inches long. Cut your sleeves off but save your scraps for later! Hem up the sleeves by folding under a 1/4 inch and iron (don't skip the ironing, it will look so much better). Then fold it over another 1/4 and iron again. Sew all the way around about a
Step Two
At this point use whatever marker you choose and mark where you want the ruched line to be. I layed the shirt down flat to find the middle of the shoulder and middle of the bottom of the sleeve.
Step Three
Thread your sewing machine with maching thread. Hand thread your bobbin with your matching elastic thread. Just wind it using your hands just like it would with the machine but don't pull it tight or leave it loose. Here are some great tips to winding a bobbin with elastic thread and tips on how to use the thread at danamadeit.com
Step Four
I started sewing at the bottom of the sleeve and went all the way up to the shoulder where I had marked it. Make sure you back stitch at the beginning and end of your sleeve. Now here is the fun, your sleeve should scrunch right up on it's own! If you want to give it extra scrunch, you can spray the ruched part or the sleeves with water and then iron!
Step Five
You could finish at this point but I didn't like the way the end of my sleeves looked after they were ruched. So, I decided to give it some more "girlyness" by putting a ruffle at the bottom of the sleeve. Since my elastic thread was already on the bobbin I just sewed along the hemline of the bottom of each sleeve making sure to back stich at the beginning and end. Whola! Instant ruffle!
Adding a Flower to your shirt
Of course there are tons of different flower tutorials out there you could use to dress up your onesie. I wanted something somewhat simple and I wanted to again use what I already had. Here is what I did for the flower.
Step One
I wanted the flower to have a clean edge instead of a raw cut edge (which would also work well and be cute). I used the sleeves that I had already cut off and cute about a inch from the hem of each sleeve and cut all around both sleeves.
Step Two
I then sewed each strip together at each end so I could have one long strip instead of two shorter ones.
Step Three
You could use your elastic thread again but since it isn't cheap I decided to just use regular thread to make a ruffle. To make the ruffle just use a longer (basting) stitch. Back stitch at the beginning and sew to the end but do NOT back stitch at the end. Pull the thread at the end and push your fabric the other way creating a scrunched ruffle.
Step Four
Take your ruffled strip and roll it into a spiral so it looks like a flower. Hand stitch the bottom of your flower with some strong thread and just sew the heck out of it to make sure all the layers are secure and together. You want to make sure it is curious baby proof and that it will make it through the laundry! Once you are happy with your flower, pick where you want to attach it to your shirt and hand sew it to that spot, again using lots of stitches to secure it in place. Your done! Put it on your little girl and it will be as cute as can be!
May 9, 2012
Cutting Brownies
My family LOVES hot out of the oven brownies! But it bothers me when they get all torn up when you cut them. I know I could wait till they cool to cut them, but I like them warm.
Well, here is a tip my good friend gave me a couple of years ago. Use a plastic knife to cut your brownies. I have to admit that at first I didn’t want to try the tip because she is younger than me and I prided myself on having good tips… but finally I gave in and tried it. It worked great, even when they are still hot!
PS. We, well I, only use Duncan Hines Chewy Fudge Brownies, mmm, those are the best brownies.
May 5, 2012
Reuse your husband's old t-shirt!
I finally got my husband to clean out his closet and dresser drawers and he accumulated quite a pile of clothes. So before I donated them, I picked out some nice t-shirts that I wanted to add to my wardrobe. These t-shirt were in good condition, he just didn't wear them anymore. All I needed to do was tailor them a little so they would fit me better!
I like to sew, but I don't really know all the correct techniques of sewing. I pretty much make it up as I go. I did take 2 sewing classes in high school so I know the very basics. I try to do things as simple and easy as I can. So forgive me for not knowing the correct sewing techniques or terms.
This is what you need:
Big t-shirt (husband's t-shirt)
Smaller fitted t-shirt (for tracing template)
Sewing machine
Thread (similar color as big t-shirt)
Fabric pen/marker (a washable pen/marker that is used for marking fabric to tailor clothes)
Scissors
Straight pins
Here is what I did:
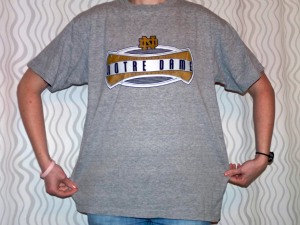
This is my husband's shirt which is too big and wide on me. I just wanted to take it in on the sides and under the arms.
1. Take your husband's shirt or a big t-shirt and turn it inside out.  Lay your smaller fitted t-shirt on top of your bigger t-shirt to be used as a tracing template. Use a fabric pen/marker to trace the outside of the smaller fitted t-shirt. I made little dash marks along the outside of the smaller t-shirt. I only traced the sides of the shirt and the under arms. I left the length of the sleeve as is.
 Lay your smaller fitted t-shirt on top of your bigger t-shirt to be used as a tracing template. Use a fabric pen/marker to trace the outside of the smaller fitted t-shirt. I made little dash marks along the outside of the smaller t-shirt. I only traced the sides of the shirt and the under arms. I left the length of the sleeve as is.
 2. After tracing the smaller t-shirt, take straight pins and pin along the trace marks. This is to hold the t-shirt together while sewing.
3. Next, sew a straight stitch along the trace marks (if you prefer another stitch, go for it, I just usually use a straight stitch). Remember to back-stitch at the beginning and end of the straight stitch. When finished sewing both sides of the t-shirt, turn it right side out and try it on. If you like the fit, turn the shirt inside out and trim the excess fabric fairly close to the stitch you just sewed. If you feel the shirt should be taken in some more, sew another stitch in closer to make it more fitted.
There you go, now you have a new fitted t-shirt!
Here is my new fitted t-shirt! I kept the sleeves the original length. But you can always hem them up to a shorter length if you like.
I hope you enjoy and get a new use out of your husband's old and beloved shirt!
May 3, 2012
Pre-Vacation Tip
This is a tip that we learned from our mom. When we were younger and were going to go on a vacation or a weekend away our mom would always make sure the house was straightened up and the kitchen clean. We just thought that was crazy, we were going to come home and mess it up anyway. But now that we are older and wiser :), we see the value in a quick clean before leaving for a vacation. Coming home to a straighten up house or a clean kitchen brings a sense of peace and relaxation. We don't feel like we have to do any housework, we can just relax before a new week starts.
We are not saying that the whole house needs to be clean, just pick up a few things, put the dishes in the dishwasher (or wash them), take the trash out, whatever makes your house feel a bit cleaner. That way when you come home from a long trip you won't feel overwhelmed thinking you have to clean everything up. Now maybe you already do this or you don't mind coming home to housework, but we feel this is a great tip to use before you go on a trip. We hope this tip is helpful to you!
-Merrellgirls
Subscribe to:
Comments (Atom)
